Requirements
- Hosting server with PHP 5.6.0+ (recommended latest stable version of PHP)
- WordPress 4.8 or newer
- Installed Easy Digital Downloads plugin
- FastSpring account with API access (our plugin works with FastSpring "Pay as you Grow" plan)
- Enabled Virtual Products on your FastSpring account (contact FastSpring support and tell them you are using our plugin and that you need “Virtual Products” enabled)
- Note: your website should use secure protocol (HTTPS), which is highly recommended, but not required.
Optional
- If you want to use the FastSpring popup checkout, then you will need to whitelist your website domain. For that you need to contact the FastSpring support
- Installed Easy Digital Downloads - Recurring Payments, if you will sell subscription based products
- Installed Easy Digital Downloads - Software Licenses plugin, if you want license functionality
Plugin Installation and Setup
Plugin installation
Install the ProteusPay - FastSpring for Easy Digital Downloads plugin like any other WordPress plugin, by uploading the plugin zip file in the wp-admin dashboard » Plugins » Add New » Upload Plugin. Once the plugin is uploaded, activate it.
That’s it, plugin is installed and ready. Now let’s look at the plugin setup.
Plugin Setup
First thing to do after plugin activation, is to setup the plugin settings. Go to Downloads » Settings » Payment Gateways » FastSpring. Here you have to fill in a few things, so let’s start!
To access all plugin settings (and enable automatic plugin updates), you will need to register the plugin. Input your ProteusPay FastSpring for EDD license key in the License key field and save the settings. You can retrieve your license key by logging into our dashboard, with the login details you received by email upon the plugin purchase. After the login you will be redirected to the purchase history, click on the purchase and you will see the license key.
After you input your license key and save the settings, other plugin settings will be displayed.
In a new browser tab, login to your FastSpring dashboard and go to Integrations » API Credentials. Create the API credentials and copy the username and password to the appropriate inputs in the plugin settings.
In the FastSpring dashboard go to Integration » Store Builder Library and copy the Access Key and paste it into the FastSpring Store Builder Library Access Key input in the plugin settings. Then follow the instructions for generating the private/public encryption keys , where you will fill in the Private encryption key in the plugin settings and configure the public key in the FastSpring dashboard. Go ahead, we'll wait 🙂
Let's continue...
In the FastSpring dashboard, go to Storefronts » Web Storefronts. Click on the “Links” button of the web storefront you want to use. A window will open in which there will be a block of HTML code (script tag). Copy just the data-storefront URL (the URL pointed out in the screenshot):
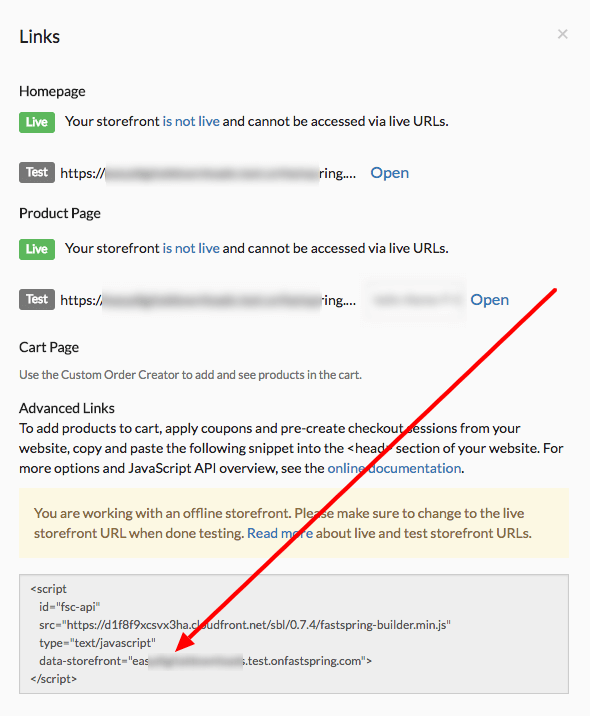
If you have problems selecting the URL only, then copy the whole block to a text editor and then copy out the URL part.
Now that you have the web storefront URL, you should paste it into the plugin settings in the FastSpring Web Storefront URL input. This URL should be as is, don't add https:// or http:// in front of it.
In the FastSpring dashboard go to Storefronts » Popup Storefronts. Click on the “Place on your website button” of the popup storefront you want to use. A window will open in which there will be a block of HTML code (script tag). Copy just the data-storefront URL, just like you did in the previous step. Paste this URL into the plugin settings in the FastSpring Popup Storefront URL input. This URL should be as is, don't add https:// or http:// in front of it.
Save the plugin settings.
NOTE: Both (web and popup) storefront URL plugin settings, will strip away the test subdomain (if your FastSpring store is still in test/trial mode). That's because our plugin will respect the EDD test mode option in wp-admin » Downloads » Settings » Payment Gateways (tab) » General (sub-tab), which, if enabled will add the test subdomain back to the storefront URL and set your EDD shop in the test mode. Once you want to go live (and you FastSpring store is also live), you can simply disable this EDD test mode and you are good to go.
For the next step you will have to setup the FastSpring webhooks, so follow the instructions in the article. Go ahead, we’ll wait for you 🙂
OK, you are back! 🙂 I trust you have just setup the FastSpring webhooks with the instructions from the link above. Great! Did you also set the secret? Awesome!
The last option, that you can set in the plugin settings is the Thank you page URL. This is the URL of the page, that the user will be redirected to, after a successful purchase. Don’t forget to save the plugin settings, when you are done.
The plugin settings are configured, so the only thing to do is to enable the FastSpring as the default and main EDD payment gateway. Go to Downloads » Settings » Payment Gateways » General. In the Payment Gateways setting enable the FastSpring checkbox and also select FastSpring as the Default Gateway in the dropdown. On this same setting page, you will see the EDD Test mode. If you are planing to test the plugin and FastSpring platform with test purchases, then I suggest that you enable this Test mode option. Once you have tested everything, you can disable this option and FastSpring will accept live payments.
NOTE: if you have multiple payment gateways enabled (checked) in the EDD payment gateway setting, then they will just be ignored in the checkout. This is because FastSpring is a collective payment solution (it has many payment options already build in: PayPal, Credit Cards, ...). So, it’s recommended, that you have only FastSpring enabled. This will also allow you to use the EDD “buy now” option, which skips the cart/checkout page steps and allows your user to buy the product as fast as possible (more about the “buy now” button later on in this article).
Product creation
All products should be created through the EDD interface (Downloads section in WordPress). When a user purchases an EDD product on your store, a “Virtual product” from EDD will be created and processed on FastSpring.
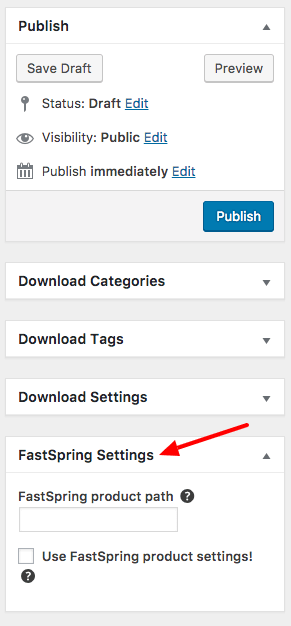
If you have existing FastSpring products and you want to use these existing product fulfillments (set in FastSpring dashboard), then you can connect this existing FS product to the EDD download/product, by inputting the FastSpring product path into the EDD download settings (the “FastSpring Settings” meta box under the publish button). This will trigger the FS product fulfillments. However, the price, quantity and other settings will be used from the EDD download settings (not from FS product settings), unless, if you check the Use FastSpring product settings checkbox. If you enable that checkbox, then the FS product settings (product type, price, ...) will be used instead.
Checkout
The default EDD checkout process is a classical one. On the single EDD download/product page you can click on the "purchase" button, which will add this product to the EDD cart. Once the user is finished with shopping, they can go to the checkout page, where they will see a summary of their shopping cart and a checkout button to finalize the purchase.
They can finalize the purchase in two ways. With a redirect to the FastSpring checkout page or with a FastSpring Popup (depending on the plugin settings).
The other checkout process is more direct and is great for single product purchases. It’s called “buy now”. You can enable it on the single EDD download edit page in the “Download Settings” section in the sidebar.
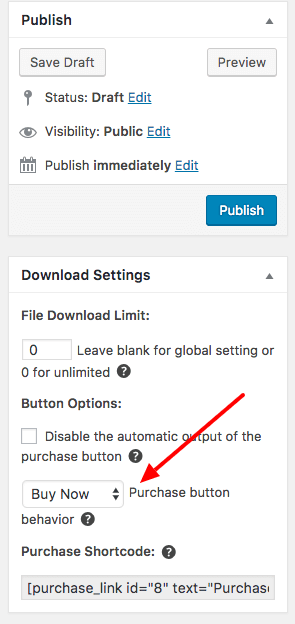
For this “Buy now” option to be available, your site has to have EDD taxes disabled and FastSpring must be the only enabled payment gateway for EDD. Once you enable the “Buy now” option for a product, the purchase button on the single product page will redirect your customer directly to the FastSpring checkout page or it will open FastSpring Popup (depending on the plugin settings).
Test mode
The best way to start using our plugin, is to put EDD in test mode, by going to wp-admin » Downloads » Settings » Payment Gateways (tab) » General (sub-tab) and enabling the Test mode. All purchases, that you make on your site via FastSpring will be made in test mode. In order to make these test purchases, you will have to use special test credit card details. Login to your FastSpring dashboard and go to Storefronts » Web Storefronts. Here you will see the "Test" button, click it and you will get the credit card details, that you should use to make the test payments on your site.
Note: As long as your EDD site is in the test mode, no live purchases can be made.
Once you have configured the plugin, the products,... and are ready to go live (your FastSpring store is also live -> not in test/trial mode anymore), simply disable the EDD Test mode. Once you do that, your shop is live and it will accept live purchases from your visitors.
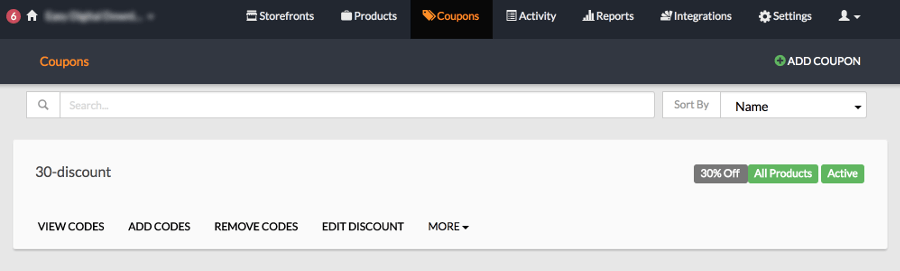
We also recommend, that you make a live test purchase with a 100% discount code, which you can create in the FastSpring dashboard, just so you know, that everything works as it should.
Refunds
Refunds should be issued in the FastSpring dashboard. The FastSpring refunds are nonreversible, that’s why they should be issued from the FS dashboard. Once you issue a refund, the changes will also be recorded in your EDD dashboard. The EDD payment will be marked as refunded. Any attached licenses or subscriptions will be marked appropriately as well.
Discount Codes
Both EDD and FastSpring can define discount codes (coupons). They have both different systems for discounts, so they have to be used depending on which flow of purchases you are using on your site.
Coupons on FastSpring
Coupons defined in the FastSpring dashboard, can be used by your users on the FastSpring checkout popup.
Discount codes on Easy Digital Downloads
Discount codes can be defined in Downloads » Discount codes in your wp-admin dashboard. Users will be able to use these discount codes on the EDD checkout page (but not on the FastSpring checkout popup).

In most cases, it's better to create discount codes in FastSpring, so that users can apply the discount on the FastSpring popup checkout.